
How to add a logo gallery in Squarespace 7.1 (that’s easy to update)

Adding a logo gallery in Squarespace is quite easy to do. There are a few different ways to do that, but some are easier to maintain than others, and some options have limitations design wise.
Logo galleries are often found on Home or About pages and show where the business have been featured (although these can be put on any website page). These are a great way to show “social proof” and demonstrate that you have credibility.
In my experience in redesigning hundreds of Squarespace websites, I have seen clients struggling with these galleries as they were not using the best tools to display their logo images. The beauty of Squarespace is that there are so many easy to use and update blocks so we should definitely take advantage of that!
In this post I will review the different options for adding a logo gallery in Squarespace 7.1 along with the pros and cons of each method.
Option 1 for adding a logo gallery in Squarespace - adding images manually
Adding logo photos manually would be feasible in cases where you have a small number of logo images and you won’t be changing the number of photos very often.
Pros: can position logos anywhere to create unique layout
Cons: too hard to update for these reasons:
if you want to delete a logo image, you have to move all the other logos around to accommodate the missing logo image
If you want to change the number of columns it is a time consuming process to re-lay out the whole section
your logo layout must be done separately for mobile and may involve lots of adjusting depending on the desired layout
Option 2 for adding a logo gallery in Squarespace - using a gallery block
Using a grid gallery block is a good option for creating logo galleries in Squarespace. To add a gallery block you will click on “Add Block” in the section you wish to add it and then select “Gallery” from the right hand column.


The grid gallery is added by default (there are different kinds of galleries) and this is the one we want to use for the logo gallery. You can add your logo images by either dragging images directly from your computer onto the white space where it says “upload images” or else you can click the + sign in the bottom right of the screen to search for images already uploaded to your site.

Under the Design tab make sure “grid” is selected as the gallery type. Choose the aspect ratio that works best for your logo images and toggle off “crop images”. Set the desired thumbnails per row and spacing.
Once you have uploaded your images, it is easy to rearrange the order, delete or even add new logos.
Pros:
The best thing about using the gallery block to add logo images to your website is that you have the flexibility to add it with any other content in a section. This allows so much design flexibility. You can do things like put your heading beside the gallery, add a shape block behind the gallery to have a color block behind the logos and so much more!
it is easy to add and delete logos as well as change the order they appear in
the size of the gallery is easy to customize
gallery displays in 2 columns on mobile which works great for logos
Cons:
if your images are not a similar aspect ratio there is the potential for some cropping to occur. Make sure you toggle off the crop images option on the Design tab and choose the aspect ratio that best works with your images
Option 3 for adding a logo gallery in Squarespace - using a gallery section
A gallery section is different from a gallery block (in the last option). Whereas a gallery block can be added within a regular section combined with other elements, a gallery section is it’s own section and cannot be combined with other content within that section.
To add a gallery section, while editing your page go to where you want to add your gallery and click on the “Add Section” blue button in between the sections. Scroll down to the Image options and choose the one that looks like 3 columns of similar sized images. This is the grid gallery.
To add your images, click on the “edit gallery” option in the menu in the top right of the section. Delete the sample photos and add your own photos using the arrow. You can change the order of the images by dragging the images around.
To adjust the spacing, number of columns, aspect ratio etc, click on the “edit section” option in the menu in the top right of the section.
Pros:
easy to update and change order
displays 2 columns on mobile
Cons:
it’s harder to control the spacing and cropping of images
logos can get cropped if not a uniform aspect ratio
is in it’s own section so can’t be placed beside other content
Option 4 for adding a logo gallery in Squarespace - using an Auto Layout list section
This is my favorite way to add a logo gallery because of the flexibility of the layout and how easy it is to adjust. There are some limititations (but I do have some bonus code below to help solve one of the issues).
To add a list section to your site, while in edit mode on the page where you want to add the new section, scroll down to where the section will go and click “Add section”. Go to the Services menu and click on one of the options that has the icon of an i with a circle around it in the corner.

To set up the Auto layout section:
Choose “Edit Content” in the menu in the top right of the section.
In the first tab “Elements” you can turn off everything except the image. Toggle on the Section title if you want to have a heading in this section.
On the Content tab you can delete the sample items then click “Add” to add a new item. Click on the “New List Item” and add an image by click on the +. Continue this step for each logo you want to add.
You can reorder the logo images by dragging on the dots beside the item thumbnails.
On the Design tab you can set the number of columns, the image aspect ratio, and so many more options under the “Size & Space” option for space between rows and columns etc.
I recommend setting Image Crop to “Original” to ensure your logos will not get cropped.
Pros:
easy to change layout - number of columns - switch to a carousel, add more spacing, rearrange images
images will not get cropped if “original” aspect ratio is chosen
Cons:
is in it’s own section so can’t be placed beside other content
harder to control the width of the whole logo gallery but easier to control spacing between images
harder to control number of columns on tablet devices
by default the images display in one column on mobile (but you can add the code below to change it to 2 columns)
Bonus #1 - code solutions for logo galleries
Adding a bit of code to the Custom CSS panel of your Squarespace website will create some “magic” for you.
There are 2 steps required to make the code work. The first step involves indicating the section you want the code to apply to by adding an “anchor link” keyword and the second step involves copying and pasting the code below to your site.
To indicate which section you want the code to apply to: Add the anchor link keyword to the anchor link area (see video below)
Copy the code below and paste it in the Custom CSS area. You will find that on the pages panel by scrolling to the bottom. Locate the “Utilities” menu at the bottom. Click on the “Website Tools” option then click on “Custom CSS”.
For Auto Layout lists
1. Display 2 columns on mobile
Add anchor link keyword list-2col to the desired section
Paste in the code below to the Custom CSS window:
 // simple list and carousel list 2 columns on mobile
 .page-section[id*="list-2col"] {
    @media only screen and (max-width: 749px) {
       .user-items-list-simple, .user-items-list-carousel__slides {
         grid-template-columns: repeat(2,1fr) !important;
      }
  }
  }
2. change the width of the autolayout gallery
This will change the width of the INSET auto layout gallery width. Step 1 is to make sure you have the inset layout width chosen for your auto layout list section. You will find this setting by clicking on “Edit Content” in the top right menu of the section and then going to Design -> Size & Space -> Layout Width = inset.
You can change the value of the variable @inset-list-width to the width of your choice. This is what percentage of the width of the device the gallery will take up.
Add anchor link keyword list-custom-width to the desired section

Paste in the code below to the Custom CSS window:
@inset-list-width: 75vw;
// reduce width of inset list sections on desktop
.page-section[id*="list-custom-width"]{
  @media only screen and (min-width: 750px) {
    .user-items-list-simple[data-layout-width="inset"], .user-items-list-carousel[data-layout-width="inset"], .user-items-list[data-layout-width="inset"] {
      max-width: @inset-list-width;
      margin: 0 auto;
    }
  }
}
For any section type
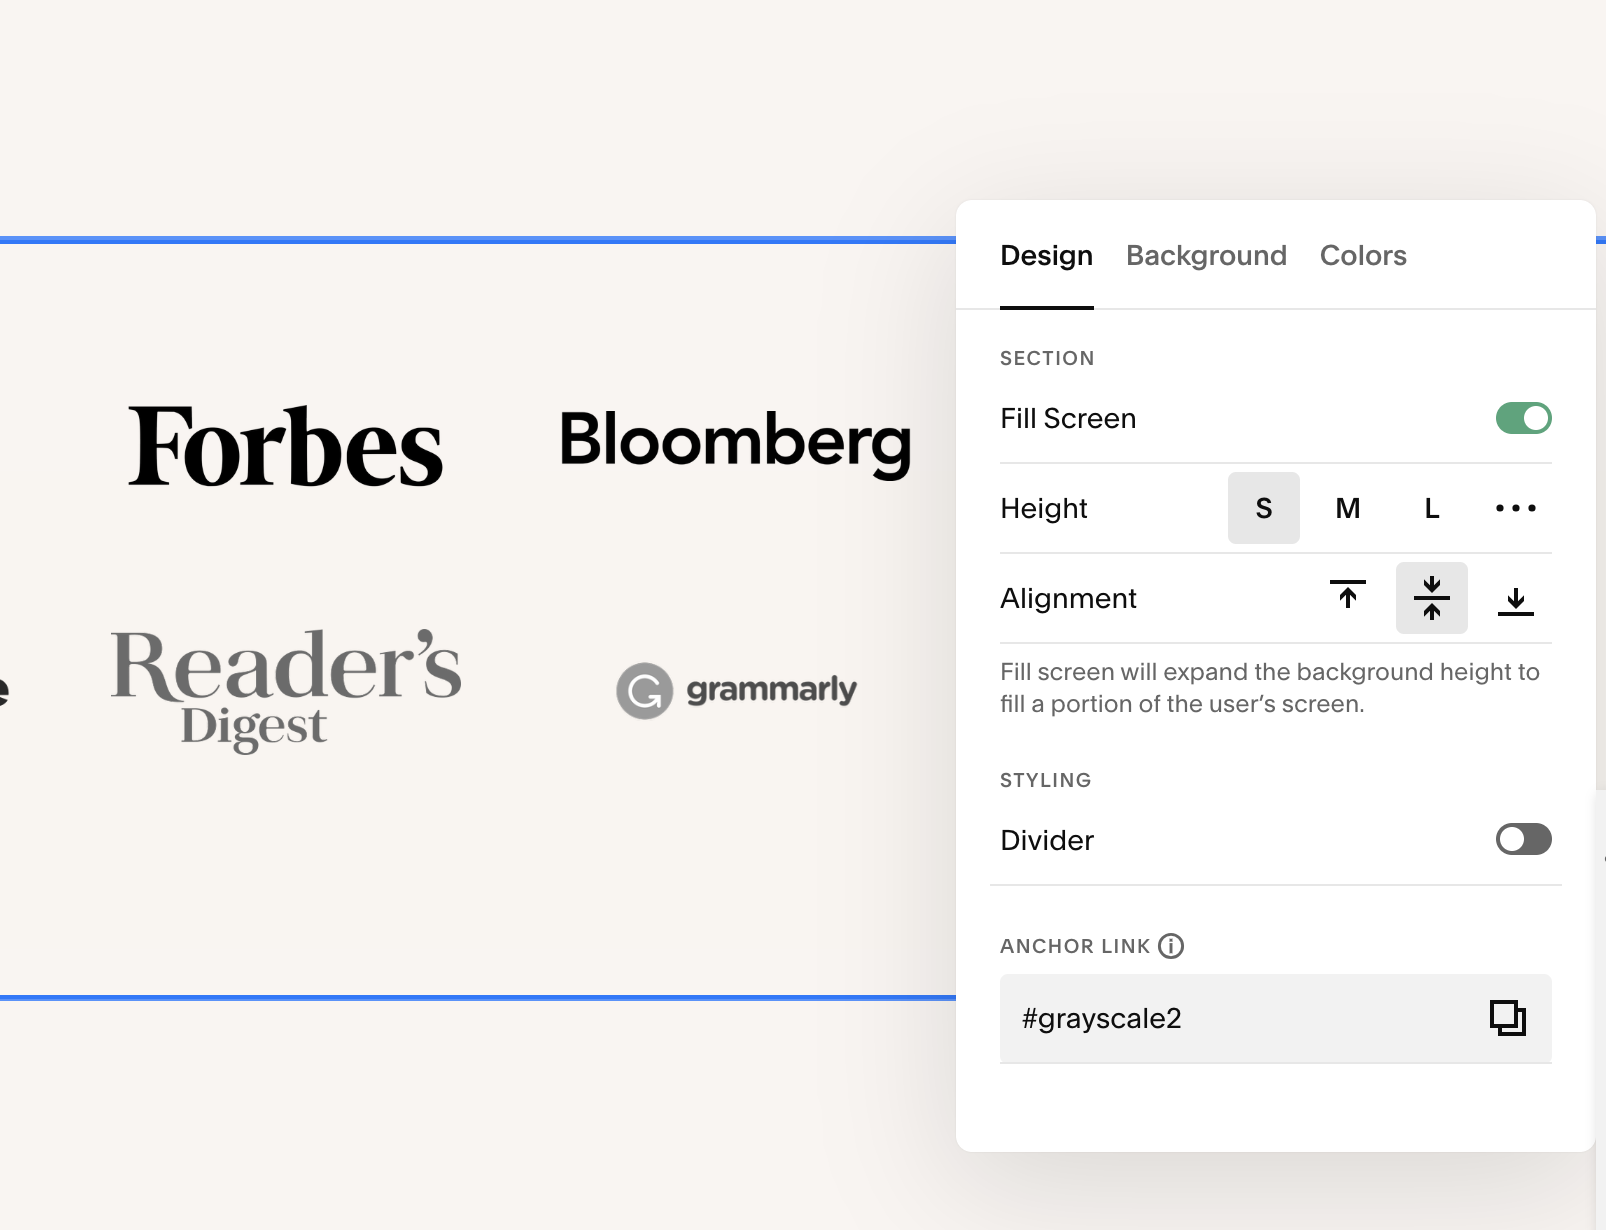
make the images in the section appear as grayscale
Add anchor link keyword grayscale to the desired section
Paste in the code below to the Custom CSS window:
// grayscale images
.page-section[id*="grayscale"]{
  img {
    filter: grayscale(100%) !important;
  }
}
Bonus #2 - Make your logos automatically scroll
Do you want scrolling logos that scroll automatically? There are two options I recommend for this.
The first is a free option that uses a gallery section which you can find on Inside the Square. This option is a little bit harder to finesse but is worth trying if you don’t want to pay for a plugin.
The second option is a plugin from Chris Schwartz-Edmisten. I use this on my Squarespace Design Day page to show off website Home pages that I have designed on Squarespace in as little as one day (so its not just for logos!). This plugin uses a list gallery section and it is easy to control the speed that it scrolls. You can find the scrolling logos plugin here (*affiliate link).
In conclusion, we have a few options to add logo images to our Squarespace website, but which method we choose will be determined by things such as:
whether we want to combine the logos in a section with other content
if our images are all the same aspect ratio
how we want to show the logos on mobile
and whether we want a grid layout or just a free form layout
Choose the option that will be work best for you, but will also be easy to update.
